
 |
| Photo courtesy of Portland Nursery.com |
Since it's much too early to plant flowers here, I decided to make a scarf which would satisfy my craving for a bit of spring colour. Some wonderful blogger (and I wish I could remember who or where I saw this so I could give her credit!) said she loved crocheting with embroidery thread because you could get such gorgeous colours in small amounts for a very reasonable price. Hmmm...beautiful colours...modest cost...almost as satisfying as buying real flowers.
So I stopped by Joann Fabrics and picked up some pale green Spa yarn by Naturally Caron, and a handful of flowery-toned hanks of DMC floss. The Spa yarn, ignoring my desire for bright colours, immediately insisted on being made into the Bean Blossom Scarf. But once that was done, I was free to pursue my Primrose Path and begin designing the flower pattern, which follows.

I used embroidery floss and a size 5 hook for my flowers. One hank will yield 6 flower centers, OR 3 sets of flower petals. My finished scarf has 20 flowers and is about 60" long.
A tip for crocheting with embroidery floss: Don't use the Magic Ring start since the crocheted object will be manipulated after being made. I found this out the hard way by having some flower centers come apart while developing the pattern.
Special Stitch Used: CTR (connected triple crochet - this is my name for it, anyway)
Insert hook through top front 2 loops of previous tr. YO twice (this will give you 2 extra loops on the hook). Insert hook into flower center loop, *yo, draw yarn through 2 loops on hook (twice), **yo, draw yarn through 3 loops on hook (twice).
Now that we've gotten that out of the way, let's make a scarf!
 |
| Mrs. Micawber's Primrose Path Scarf - Flower |
Primrose Path Flower Shorthand Pattern:
Flower Centers
Ch 4. Join with sl st to form ring.
Round 1: Ch 2. HDC 12 in ring. Join with sl st in first HDC.
Round 2: *Ch 3, skip a stitch, sl st in next st. Repeat from * around circle to yield 6 loops.
Sl st in first sl st. Tie off; cut thread and weave in ends.
Flower Petals
Attach new colour in loop. Ch 1.
*In NEXT loop, sc, ch 2, dc, tr, ch 4, CTR (see Special Stitch above), dc, ch 2, sc.
Repeat from * around to make 6 petals.
Sl st in first sc, tie off.
Cut thread and weave in ends.
Primrose Path Flower Tutorial in Plain English with Photos:
Flower Centers
Chain 4. Join with slip stitch to form ring. (The hole in the middle will be VERY small.)

Round 1: Chain 2. Make 12 half-double crochets in ring (hold short thread end so that you stitch over it at the same time, all the way around). Join to first half-double crochet with slip stitch.
 |
| Whoa...out of focus! |
Round 2: Chain 3. Slip stitch in 2nd stitch over. Repeat this around the circle until you have 6 loops (they will be very flat loops).


Slip stitch in first slip stitch, tie off, cut thread, and weave in ends.
Remember how you held the short thread end and stitched over it? That means it's already woven in and you can snip it right off.

Here's how I weave in the other end: Push a darning needle through flower in the path you want the thread to go. THEN put thread through needle eye, pull through, and cut. Done!

Now you're ready to make the next flower center. Before you know it, they'll be all over the place like little yellow pollywogs:

Flower Petals
Attach new colour in one of the loops. Chain 1.

In NEXT loop, single crochet, chain 2, double crochet, triple crochet, chain 4.

Yarn over twice (this will give you 2 extra loops on the hook).

Insert hook into same flower center loop, *yarn over and draw yarn through 2 loops on hook (do this twice), **yarn over and draw yarn through 3 loops on hook (twice). You're basically making a regular triple crochet, but since the hook got stuck through those extra loops at the beginning of the stitch, you have to draw through some extra loops to work the stitch off the hook. (I hope that makes sense.)


Double crochet, chain 2, single crochet. Et voilà! Your first flower petal is complete.

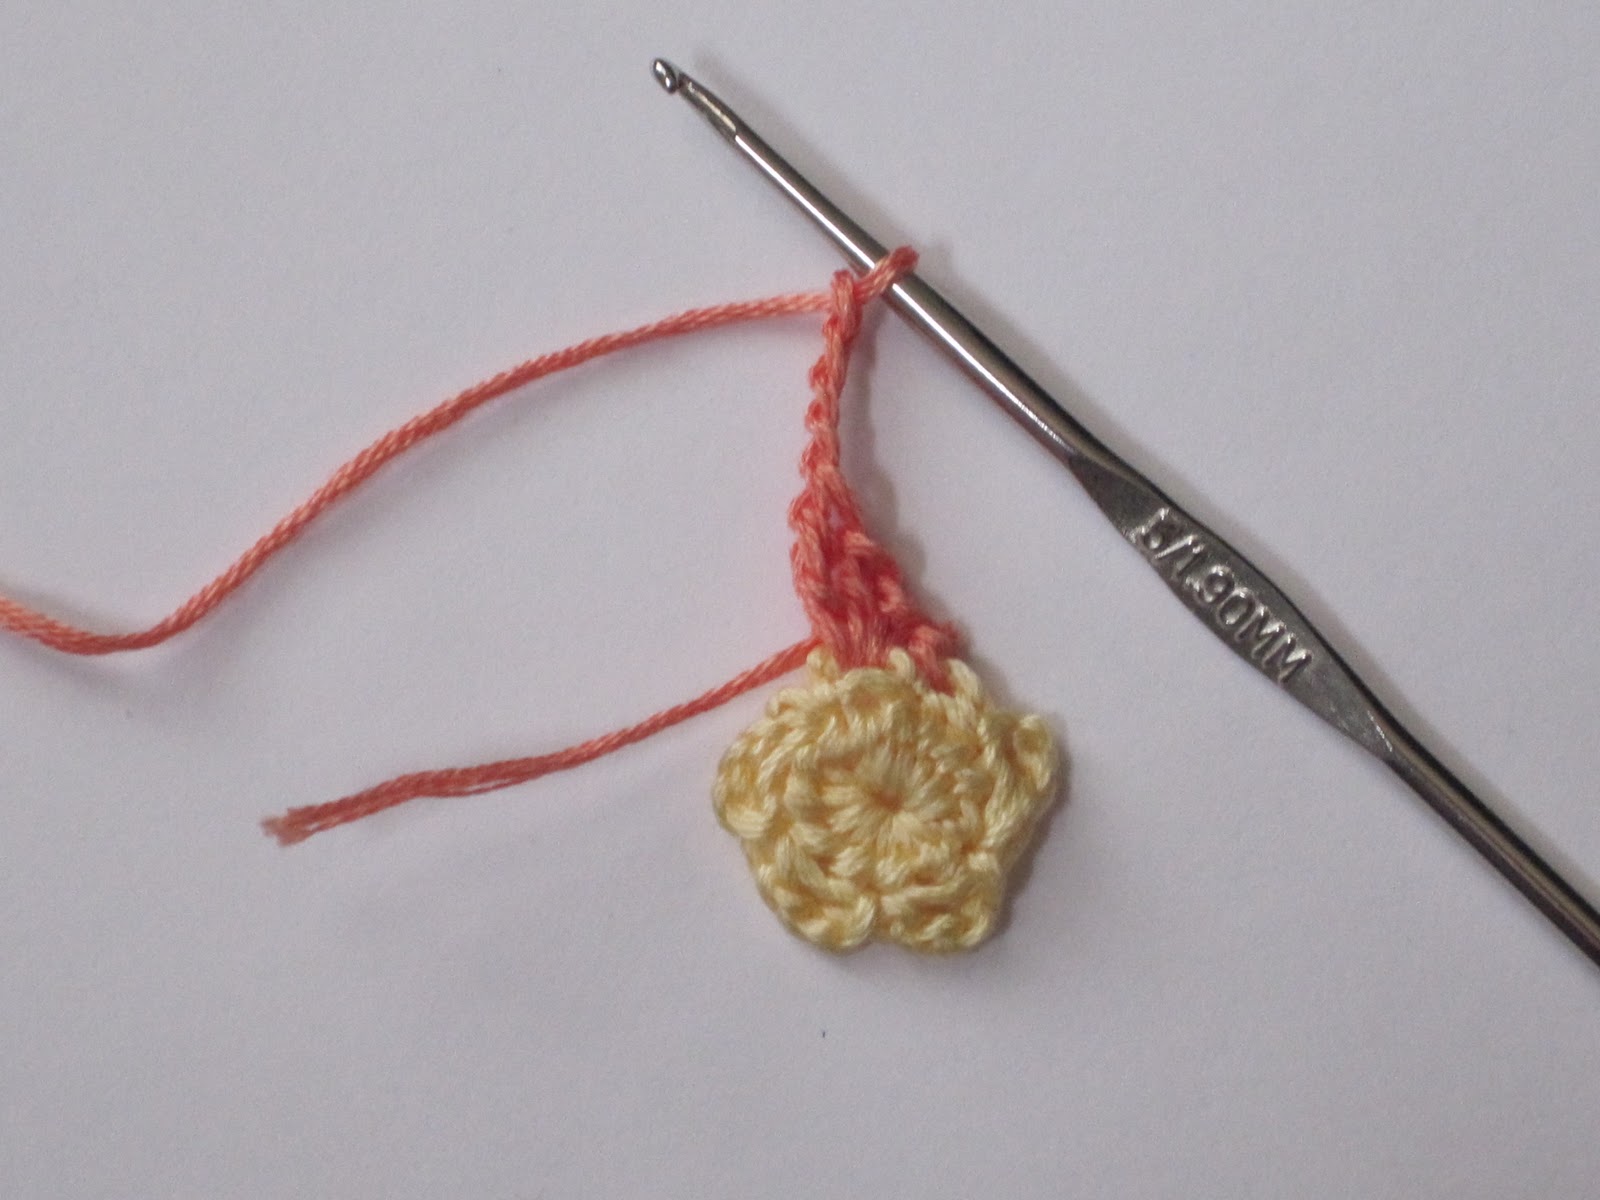
By the way--see the thread end sticking out? I'm crocheting over that end while making petals so I don't have to weave it in later. Here it is after 3 petals:

Make a total of 6 petals the same way (single crochet, chain 2, double crochet, triple crochet, chain 4, CTR, double crochet, chain 2, single crochet), one petal in each loop.
When you finish the 6th petal, slip stitch in the first single crochet of the first petal, cut thread, and tie off. Your flower is complete!


Keep on making flowers - they go quite quickly once you've got the hang of it. Before you know it, you'll have a little pile all ready to be stitched together (instructions can be found in the next post - click these words and you'll be taken there).

You may do whatever you like with what you make from this pattern, but you may not sell the pattern. (Thanks to Snowcatcher for that handy phrase.)
Happy crocheting!
Every one of your patterns is gorgeous! I so enjoy reading your blog and am happy to have found it. :) The only problem is that there's so many beautiful scarves that I don't know which one to start first! :) Thanks so much for sharing.
ReplyDeleteYour fellow midwesterner,
You're welcome! I have to tell you that this particular scarf really curled up on me after a few wearings. If you do make it, I suggest treating the back side of the flowers as the front side when you add the green trim. That might help a bit.
ReplyDelete