

Welcome back! So now you've got a little pile of crochet primroses just waiting to be joined into a scarf (see Primrose Path Scarf, Step 1):

Tip: If your flowers are made of embroidery floss, you might want to lightly block them now. It will help the scarf not to curl up too much later. (This is the voice of experience speaking.)
And now....the pattern. I used Spa yarn by Caron and a size G hook for my Primrose Path leaves. The finished scarf has 20 flowers and is about 60" long.

Primrose Path Leaves and Tassels Charts:
 |
| Mrs. Micawber's Primrose Path Scarf - side leaves and connecting leaves |
 |
| Mrs. Micawber's Primrose Path Scarf - tassel legs (make 3) |
Primrose Path Leaves Shorthand Pattern:
Join leaf yarn in any petal loop of first flower.
1) Ch 4, tr in same loop. Sl st in next loop. Repeat. (2 long side leaves made)
2) Ch 3, dc in same loop. (1st short connecting leaf made)
3) Ch 3, dc in top of previous dc. (2nd short connecting leaf made) Sl st in petal loop of next flower.
Repeat steps 1-3 until you get to the last flower.
In last flower, repeat steps 1-2.
Make tassel: Ch 13. *Hdc 6 in next chain from hook. Sl st in next chain (bobble made). Ch 11. Remove hook, twist chain 2-3 times, re-insert hook, sl st in top of last dc made.*
Ch 15. Repeat from * to *, chaining 13 instead of 11 after bobble made.
Ch 13. Repeat from * to *. Tassel complete.
Ch 3, dc in same dc as before. Sl st to next loop of end flower.
Step 4) Same as step 1.
Step 5) Same as step 2.
Sl st in joint between short connecting leaves from opposite side.
Step 6) Ch 3, dc in sl st at base of chain. Sl st in first open petal loop of next flower.
Repeat steps 4-6 until you reach the beginning flower.
Repeat steps 4-5 in beginning flower.
Make tassel as before.
Sl st to beginning stitch (where yarn was attached). Cut yarn and tie off.
Primrose Path Leaves Pattern in Plain English with Tutorial:
I laid my flowers out on the floor and played around with the order until I got what I wanted:

Then I stacked them in a little cup so they'd stay in order.
Let's crochet!
First Lengthwise Half of Scarf
Join leaf yarn in any petal loop of first flower:

Long Side Leaves
Chain 4. Triple crochet in same loop.

Slip stitch in NEXT loop. One long side leaf made:

Chain 4, triple crochet in loop, and slip stitch in NEXT loop again to make another long side leaf:

Short Connecting Leaves
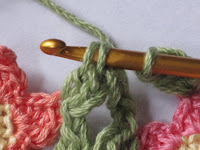
Chain 3, double crochet in same loop. First short connecting leaf made:

Chain 3, yarn over, insert hook in top of short leaf just made, then make double crochet:

2nd short connecting leaf made:

Slip stitch in any loop of NEXT flower. Yarn should be behind the hook. Insert hook from front to back of flower loop:

Now you're ready to make the next set of long side leaves and short connecting leaves:

Repeat above steps, making 2 long side leaves in each flower, and 2 short connecting leaves between flowers, until all your flowers are connected.

When you get to the last leaf, make 2 more long side leaves, and ONE short connecting leaf.
Then chain 13:

Make 6 half-double crochets in next chain from hook:

Slip stitch in the next chain after that.

Chain 11, remove hook from loop, and twist chain 2 or 3 times with your fingers (holding the working yarn up and out of the way):

Insert hook back into loop, and slip stitch in top of short connecting leaf:

Pull gently on the bobble. The "leg" should twist around itself. If you're not happy with the twist, undo the slip stitch, re-twist, and slip stitch again. This one came out just the way I like it:

Chain 15, half-double crochet 6 in next chain from hook, slip stitch in next chain, chain 13, twist, slip stitch to top of short connecting leaf. 2nd leg of tassel made.
Chain 13, half-double crochet 6 in next chain from hook, slip stitch in next chain, chain 11, twist, slip stitch to top of short connecting leaf. 3rd leg of tassel made.

Chain 3, double crochet in top of last short leaf (the same place the tassel legs are connected):

Slip stitch to next open flower loop. Now you're ready to start back up the other side of the scarf:

Second Lengthwise Half of Scarf
Make 2 long side leaves, then ONE short connecting leaf in current flower:

Slip stitch to middle of connecting leaves from opposite side:
Make another short connecting leaf (chain 3, double crochet in same place as slip stitch). Now you should have an "X" shape made of short connecting leaves.
Now slip stitch to NEXT open loop of NEXT flower:

Follow these steps up the second long side of the scarf (2 long side leaves, 1 short connecting leaf, slip stitch to connecting leaves from opposite side, make another short connecting leaf, slip stitch to next flower) until you reach the other end.

Make tassel as before.

Slip stitch to beginning stitch (where yarn was first attached). Cut yarn, tie off, weave in ends, and you're done! Isn't it beautiful? You may do whatever you like with what you make from this pattern, but you may not sell the pattern. (Thanks to Snowcatcher for that handy phrase.)
Happy spring!

What a great project and tutorial! I love how you photographed it all along the way. What a cheery, springy, bright and happy scarf!
ReplyDeleteWow, thank you, Snowcatcher!
ReplyDeleteHi there Mrs. Micawber,
ReplyDeleteI found your blog thru Craftgossip in the crochet section.
I'm a beginner crocheter and I must tell you that I love the pics for each step. I am a visual person, but appreciate the drawn charts too.
I'm definitely making these (when I can get around to it).
Thanks for your fun style of blogging also.
I'll be following you.
Alysen
Thank you so much, Alysen!
ReplyDeleteI am so happy to have found your blog! This scarf pattern is gorgeous. :) So good of you to share it with us all.
ReplyDeleteA new fan,
Thanks! I have to admit that after a few wearings, this scarf really wants to curl in at the sides. If I made it again I might try doing the leaf portion with the backs of the flowers facing forward (if that makes sense) because the flowers also want to curl in a bit. Or possibly making the outer flower round in the opposite direction to the inner flower round. If you make it, let me know how it works out for you!
ReplyDeleteHi Sue,
ReplyDeleteCould I possibly have a high resolution picture of this pattern to use in a magazine article I'm writing? It would be credited and linked to this post.
Best wishes
Joanne